Running out of space on your Nintendo Switch can be frustrating, especially as new games and updates keep getting bigger. Modern titles often come with large patches, downloadable content, and higher-quality textures that quickly fill the console’s default storage. The good news? Expanding your storage is simple once you know where to start. But before you rush to buy a microSD card, there are a few key choices and setup steps that make all the difference.
Expanding Nintendo Switch storage is a simple and effective way to fit more games, updates, and screenshots without constantly deleting content. (Image: ABWavesGame)
From picking the right card to managing your data wisely, learning how to expand Nintendo Switch storage is about more than just adding space — it’s about keeping your entire gaming experience running smoothly. Whether you’re a casual player or someone with dozens of eShop titles, a proper storage setup helps prevent errors, speeds up load times, and guarantees you always have space for the next game you want to try.
Although the Nintendo Switch comes with built-in internal storage, its limited capacity often necessitates additional solutions. The original Switch and Switch Lite include 32GB, while the OLED model offers 64GB. Considering that some single games exceed 20GB, storage fills up fast.
For Nintendo Switch storage, players can use cloud saves to back up game data, which helps protect progress without consuming physical space. However, cloud storage does not expand internal storage for game installations — it simply stores your save files online if you subscribe to Nintendo Switch Online.
Additionally, the Switch manages storage based on where games are installed. For example:
Physical cartridges still require storage space for updates and additional data.
Downloaded titles consume internal or microSD card space entirely.
Screenshots and videos also take up storage over time, especially if you use the capture button frequently.
To optimize Nintendo Switch storage, consider adding a microSD card, regularly managing downloads, and backing up saves to the cloud. Understanding these distinctions will help you manage Nintendo Switch storage more effectively and keep your favorite games ready to play.
A good storage strategy doesn’t just avoid running out of space — it keeps your console faster and prevents corrupted files caused by constant installations and deletions.
Choosing the right microSD card for your Switch
Choosing the right microSD card for your Switch is key to expanding storage without headaches. Not all cards perform the same, and choosing an unreliable or low-speed option can cause long loading times, slow downloads, or even read errors.
To avoid compatibility issues, pick a microSD card for your Switch that’s officially supported and uses trusted standards like UHS-I. Cards with UHS-II or UHS-III technology will work but won’t offer additional speed because the Switch doesn’t support those higher standards.
When shopping, pay close attention to rating symbols:
U1 cards are acceptable but may be slow for larger games
U3 cards offer faster write speeds and ideal performance
V30 video speed class ensures consistent performance in demanding titles
Reliable brands like SanDisk, Samsung, and Lexar tend to offer better durability and fewer failures. Nintendo even partners with SanDisk to offer microSD cards labeled specifically for the Switch, although they’re usually not required unless you prefer branded accessories.
Finally, make sure the microSD card for your Switch has enough capacity for your library. For most players:
128GB to 256GB is great for mixed physical/digital libraries
400GB to 512GB suits players who download often
1TB is ideal for heavy digital users or anyone wanting long-term storage without upgrades
Choosing the right microSD card ensures smooth gameplay, reliable installs, and faster file transfers.
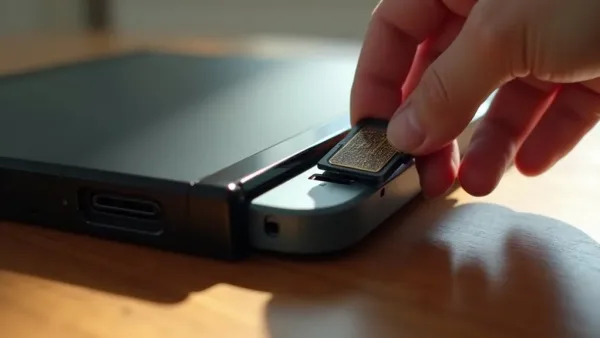
How to install and format a microSD card
Installing and formatting a microSD card on a Nintendo Switch is a simple way to boost your storage for games, updates, and screenshots. The process is fast, but each step matters to avoid errors later.
To get started, choose a compatible microSD card with the proper speed rating. Turn off your Nintendo Switch completely — not just sleep mode — before inserting the card. This prevents system errors and helps the console detect the card correctly on startup.
Next, gently insert the microSD card into the slot beneath the kickstand on the standard and OLED models. For the Switch Lite, the slot is located near the bottom of the console. Push until you feel a slight click.
Once you power on your console, the system will prompt you to format the microSD card, which prepares it for use and helps ensure smooth performance. Formatting deletes everything on the card, so use a new card or back up old files first.
After formatting the microSD card, you’re ready to download and play more games without worrying about space. The Switch will automatically store future downloads on the card, unless you manually move or adjust settings.
Managing game data to optimize storage
Efficiently managing game data is essential for maintaining ideal storage on the Nintendo Switch. Even with a microSD card installed, organizing your data ensures that everything runs smoothly and prevents unnecessary wear on the card.
When you focus on managing game data, you can free up space by:
Deleting unused software — you can always redownload purchased games
Archiving rarely played titles — saves remain intact
Removing large updates for games you no longer play
Backing up screenshots and videos to a computer or cloud storage
Many players forget that captures can take up gigabytes over time, especially long video recordings during gameplay.
Regularly reviewing installed games, clearing cache when possible, and organizing save files are simple storage optimization techniques that help maximize available space, improve load times, and reduce the need for frequent microSD card upgrades or data transfers.
Good management not only frees up space but also keeps your console performing well over time.
Tips for backing up and transferring save data
Protecting your Nintendo Switch save data is crucial to avoid losing progress. Some games require dozens or hundreds of hours of gameplay, and losing a save file can be devastating.
Use Nintendo Switch Online cloud backup to automatically secure your game saves, ensuring your Nintendo Switch save data is safe if your console is lost, damaged, or replaced. Most titles support cloud saves, though a few — like some competitive games — do not.
When moving to a new system, use the built-in transfer feature to move Nintendo Switch save data directly between consoles for a smooth, reliable migration that preserves your progress and keeps your games organized.
If you plan to upgrade from the standard Switch to the OLED model, proper save transfer ensures you pick up gaming exactly where you left off.
Conclusion
Expanding Nintendo Switch storage is a simple and effective way to fit more games, updates, and screenshots without constantly deleting content. To expand Nintendo Switch storage, choose a compatible high-speed microSD card, ideally between 128GB and 512GB, for smooth loading times and reliable performance.
After inserting the card into the console’s slot and formatting it in System Settings, you can manage game data efficiently by archiving unused titles, clearing space regularly, offloading screenshots, and using cloud saves to back up progress.
By taking these steps to expand Nintendo Switch storage, you’ll enjoy a smoother, more flexible gaming experience with room for your favorite titles and upcoming releases — without worrying about running out of space.